
MORE ABOUT MS WORD
How to select text
Selecting or highlighting text enables you to change that text in terms of style, font and/or colour or even replace the words if required.


This means that, even if you change your mind or want to make your creations a little more interesting, it can be done easily and quickly at different places in your document.
This guide explains how to select text in Microsoft Word. It will feature Word 2010, but earlier versions of Word will use similar steps or concepts.
You’ll need:
- A computer with Microsoft Word installed.
Follow these step-by-step instructions to select text in a document
Step 1: If you are not already in a Word document, you will need to open it. From the desktop or from your ‘Start’ menu, open Microsoft Word.
Step 2: Click either File or the Office button in the top left. Select Open and browse to the document you wish to open. Double-click on the file name to open.
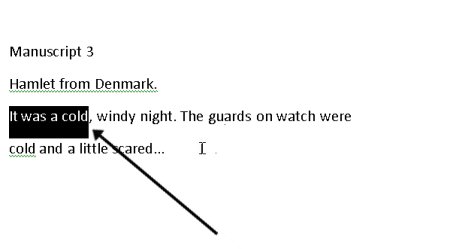
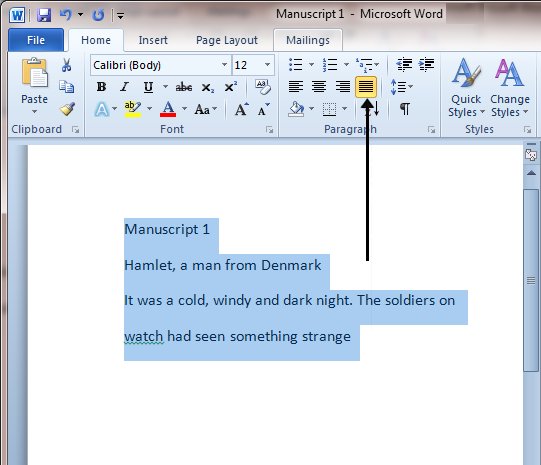
Step 3: The mouse can be used to select text. When the mouse pointer is moved over a text area, the pointer will change from an arrow to a ‘text select’ or ‘I-beam’ icon.
Step 4: Move the text select/mouse pointer with your mouse to where you’d like to start your selection. Click and hold down the left mouse button. While doing this, move the mouse across your text to where you’d like the selection to stop. As you move the mouse, the text will be selected. When you’ve finished your selection, release the left mouse button.
Step 5: The selected text can now be formatted or changed if required.
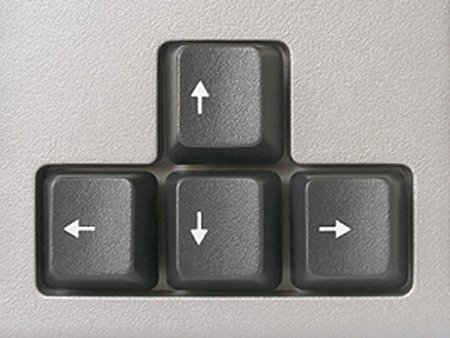
Step 6: You can also move and select text using the arrow keys on the keyboard, which some people may find easier than the mouse.
If you use a combination of keyboard keys – e.g. holding down Ctrl and Shift and pressing the left or right arrow key – you can move the cursor and select the text in different directions.
Step 7: Once text is selected (highlighted), it can be changed or edited as required.
How to change text size and font
Changing the text in your documents can help to make your creations more interesting and eye-catching.
Text can be changed to many different sizes and styles.
This guide explains how to change text size and font style in Microsoft Word. It will feature Word 2010, but may offer alternative steps if earlier versions of Word are used.
You’ll need:
- A computer with Microsoft Word installed.
Follow these step-by-step instructions to change text size and font
Step 1: Open an existing Word document or start a new document and type your text.
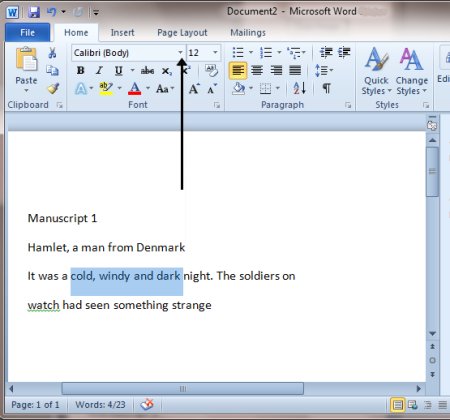
Step 2: If you’d like to change a portion of the text to a different font, it will need to be selected or highlighted first. When the mouse pointer is moved over a text area, it will change from an arrow to a ‘text select’ or ‘I-beam’ icon.
Step 3: Select your text so that it’s highlighted.
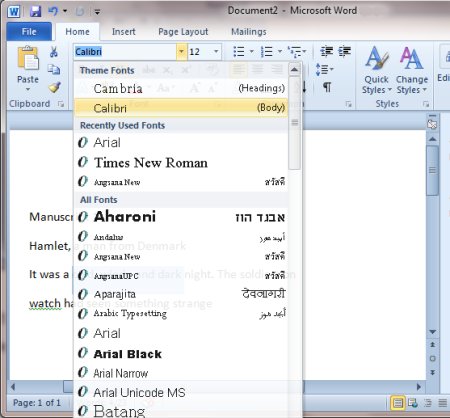
Step 4: To change the font style, click the arrow next to the font style in the ribbon at the top of your document.
Step 5: Choose your font style from the drop-down list given.
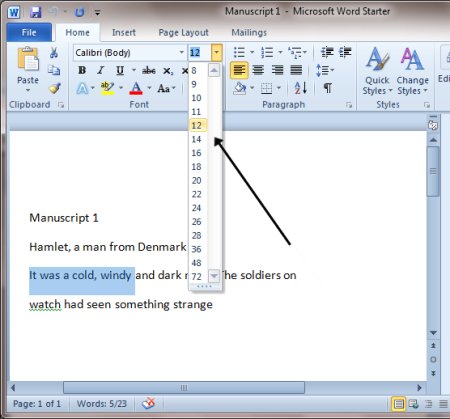
Step 6: Next to the font style box is a box containing a number and an arrow. This changes the size of the font. Click on the arrow.
Step 7: Choose the size of font from the drop-down list of options.
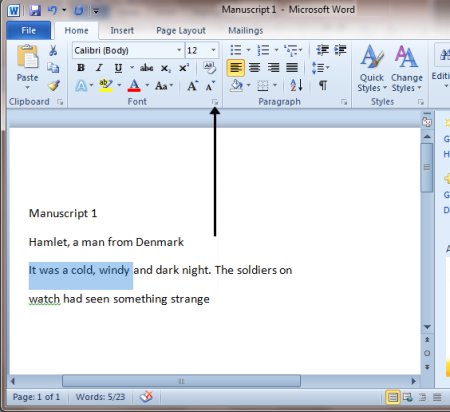
Step 8: If you’d like the same size and style of font set up every time you start a new document, you can set a ‘default font’. Click on the ‘Font’ arrow just above the main screen.
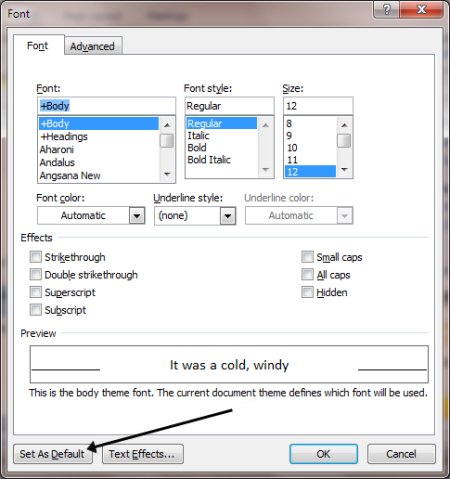
Step 9: A dialogue box will pop up. In this, choose your font size and style from the options.
Step 10: Click Set As Default in the bottom left-hand corner of the dialogue box.
Step 11: Another dialogue box will pop up asking if you’re sure you want to change the font for all Word documents. Click Yes. Now, whenever you open a new document in Word, the default font will be used.
Step 12: If you want to change the default font in an earlier version of Word, click Format at the top of your document to open the ‘Format’ menu. Choose Font from the menu list. Then follow steps 9 to 11.


How to bold, italicise or underline text
Being able to change the style of font can make your document more interesting. Different styles of text such as bold or italics can make text stand out. Underlining can be useful for headings.
This guide explains how to make text bold, italic or underlined in Microsoft Word 2010. Earlier versions of Word will use similar steps or concepts.
You’ll need:
- A computer with Microsoft Word installed.
Follow these step-by-step instructions to format text in Microsoft Word
Step 1: Open an existing Word document or start a new document and type your text.
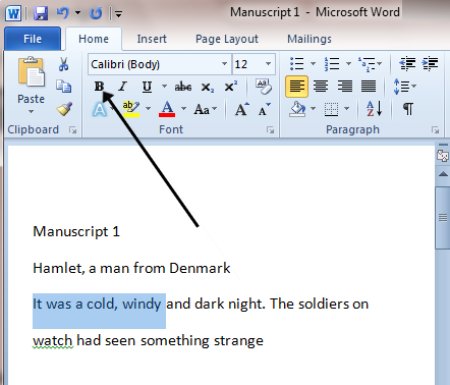
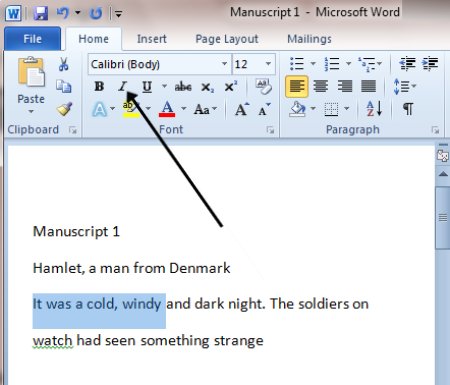
Step 2: If you’d like to change some of the text that you’ve already typed to a different font, it will need to be selected or highlighted with the mouse first. When the mouse pointer is moved over a text area, the pointer will change from an arrow to a ‘text select’ or ‘I-beam’ icon.
Step 3: Select the text that you wish to edit or change the formatting.
Step 4: To change the selected font to bold, click B in the formatting ribbon at the top of the document.
Step 5: To change the selected font to italics, click I in the formatting ribbon at the top of the document.
Step 6: To change the selected text so that it’s underlined, click U in the formatting ribbon at the top of the document.
Step 7: It’s also possible to change selected text using a combination of keyboard shortcuts, which some people find easier than using the mouse.
- To make text bold, select and highlight the text first. Then hold down Ctrl (the control key) on the keyboard and press B on the keyboard.
- To make text italic, select and highlight the text first. Then hold down Ctrl (the control key) on the keyboard and then press the I on the keyboard.
- To underline text, select and highlight the text first. Then hold down Ctrl (the control key) on the keyboard and then press the U on the keyboard.
How to copy and paste text
Copying text can be useful if you need to duplicate words you have already typed as it saves time and effort.
This guide explains how to copy selected text and paste it into another part of a document, using Microsoft Word 2010. Earlier versions of Word will use similar steps and concepts.
You’ll need:
- A computer with Microsoft Word installed.
Follow these step-by-step instructions to copy and paste text
Step 1: Open an existing Word document or start a new document and type your text.
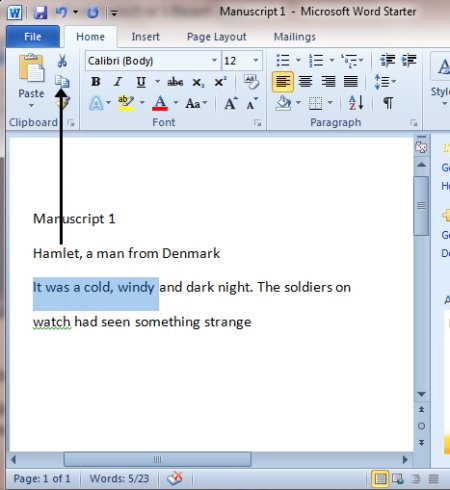
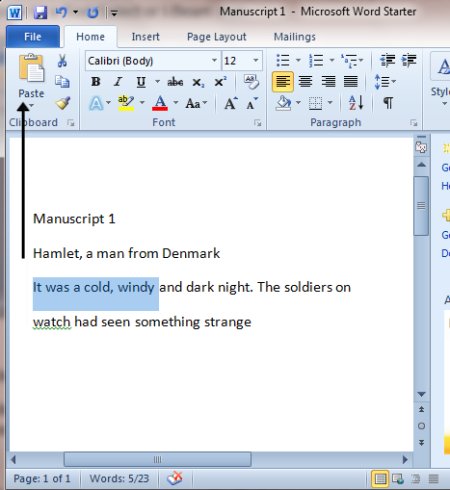
Step 2: To copy text, it will need to be selected or highlighted with the mouse first. When the mouse pointer is moved over a text area, the pointer will change from an arrow to a ‘text select’ or ‘I-beam’ icon.
Step 3: Select your text so that it’s highlighted.
Step 4: Copy the text by clicking on the copy icon at the left-hand side of the formatting ribbon.
Step 5: Use the mouse to move the cursor to where you wish to paste the copied text.
Step 6: Click Paste to insert the copied text in its new place in your text.
Step 8: Your text will now be duplicated in the new position in your document.
Step 9: Once text is highlighted, it’s also possible to copy and paste it using a keyboard shortcut instead of the mouse, which some people find easier. To copy, press and hold Ctrl (the control key) on the keyboard and then press the C on the keyboard. To paste, press and hold down Ctrl and then press V.
How to print a document
To print a document, your computer needs to be connected to a printer. Being able to print is not necessary in order to use Word, but if you want to send a letter in the post or print out a poster, you’ll need to have access to a printer.
This guide explains how to print a document in Microsoft Word 2010. Earlier versions of Word may use slightly different steps.
You’ll need:
- A computer with Microsoft Word installed.
- A printer set up and connected to your computer.
Follow these step-by-step instructions to print a document from Microsoft Word
Step 1: Open an existing Word document or start a new document and type your text.
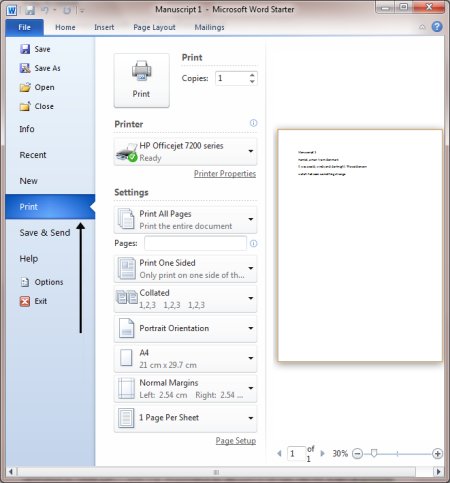
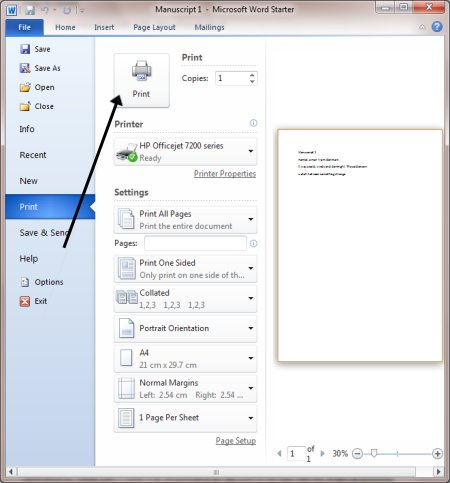
Step 2: Once you’ve completed your document and are ready to print, click File in the top left-hand corner of your document.
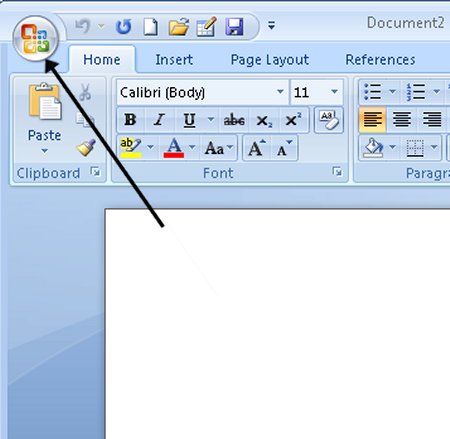
Alternatively, some versions of Word may have an Office button instead of a ‘File’ button – it’s a round Office icon in the top left-hand corner of the screen. Click on this if you have one.
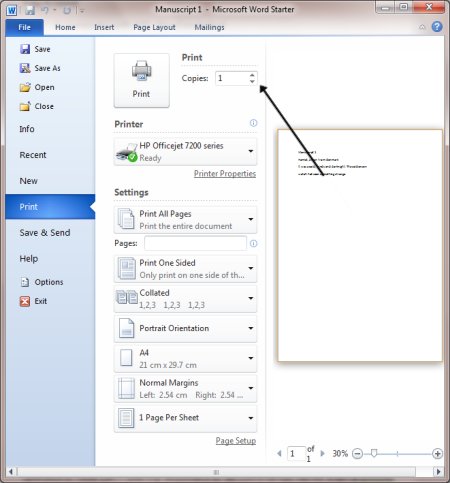
Step 3: Move down and click Print in the menu. This will bring up the ‘Print’ dialogue box.
Step 4: Choose how many copies of your document you need.
Step 5: Depending on your printer options, you can choose other printing features such as whether you want to print all pages or only certain pages. You can also change the orientation of the print from portrait to landscape and tell your computer and printer whether you’re printing on a certain size of paper. You’ll also see, on the right, a preview of your printed document will look like.
Step 6: When you’re happy with your settings, click Print. The document will now start printing on your printer.
Text layout: how to centre, left align, right align and justify text
Sometimes, a document that you’re creating may call for different text layouts. The standard layout is for the text to be aligned to the left. Other layouts that can be set up are centred text, where text will be placed in the centre of the document, right aligned where the text will be aligned to the right of the document and justified text, where the text will be aligned to the left and the right.
This guide explains how to align text in Word 2010. Other steps may be offered if methods are different in earlier versions of Word.
You’ll need:
- A computer with Microsoft Word installed.
Follow these step-by-step instructions to centre, left align, right align and justify text
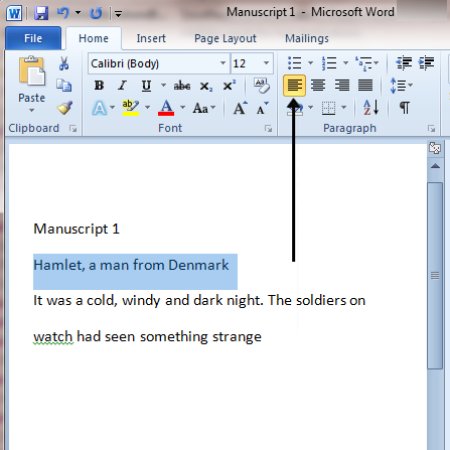
Step 1: Open an existing Word document or start a new document and type your text. The default layout is left align, where text will be aligned to the left margin of the document.
Step 2: To change the layout of your text, select the text that you wish to change by using the mouse or keyboard shortcuts.
Step 3: To centre the selected text, click on the ‘centre text’ icon in the formatting ribbon at the top of the document.
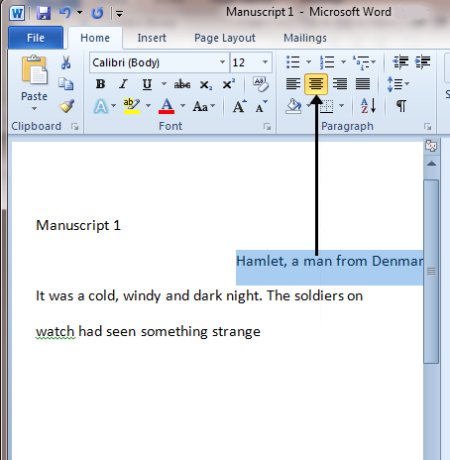
Step 4: To right align the selected text, click on the ‘right align’ icon. This will move all highlighted text so that it’s aligned to the right.
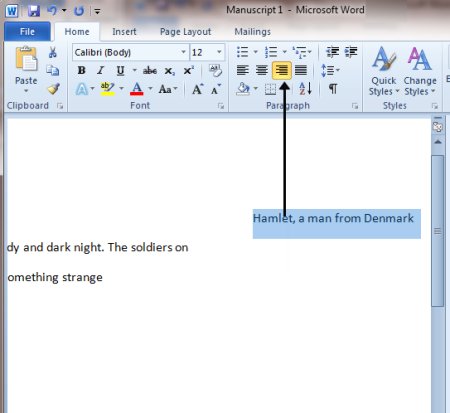
Step 5: To ‘justify’ text so that it is aligned to both right and left, click on the ‘justify’ icon.
Step 6: It’s also possible to change selected text using a combination of keyboard shortcuts, which some people find easier than using the mouse.
- To make text centred, select and highlight the text first, then hold down Ctrl (the control key) on the keyboard and press E.
- To make text right aligned, select and highlight the text first, then hold down Ctrl (the control key) on the keyboard and then press R.
- To make text justified, select and highlight the text first, then hold down Ctrl (the control key) on the keyboard and then press J.
- To make the text left aligned again, press and hold down Ctrl on the keyboard and press L.
How to create a numbered or bulleted list
Using numbered or bulleted lists can help if you want to make items stand out or show important steps in a document.
This guide explains how to insert bullet points or numbers in a document in Microsoft Word 2010. Some steps may be different in earlier versions, but similar in concept.
You’ll need:
- A computer with Microsoft Word installed.
Follow these step-by-step instructions to created a numbered or bulleted list
Step 1: Open or start a new Microsoft Word document if you do not already have one open.
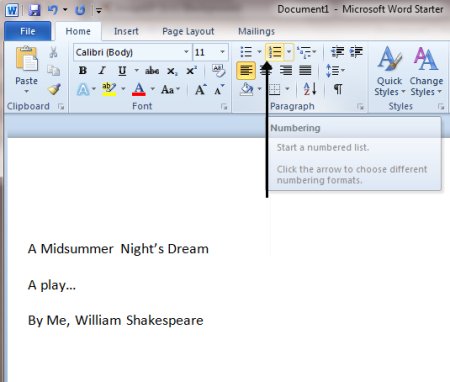
Step 2: To create a numbered list, click on the numbering icon at the top of the document.
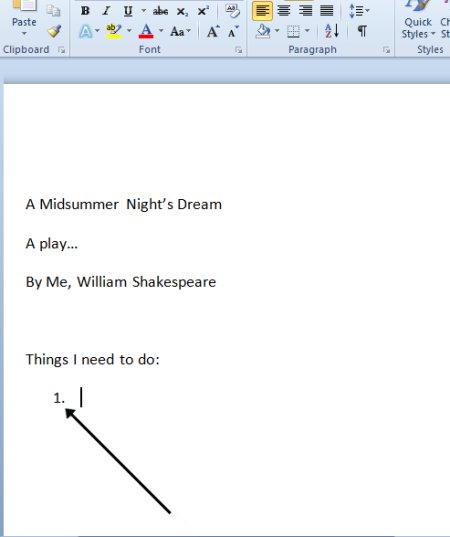
Step 3: The first number will now be inserted into your text.
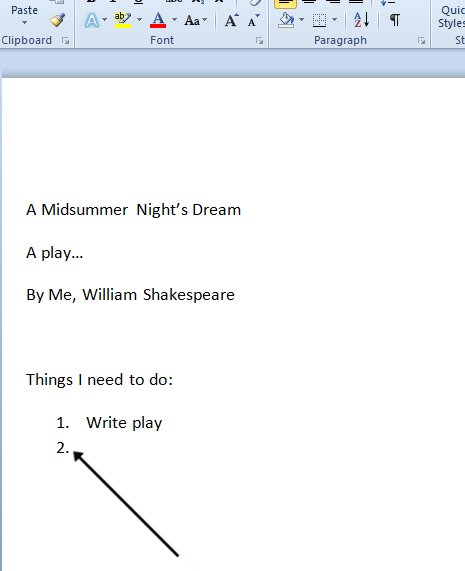
Step 4: Type the first item on your list.
Step 5: When you press the ‘Enter’ (or ‘Return’) key to go to the next line, the next number will be inserted and so on.
Step 6: To stop the numbers being inserted and go back to standard text, click on the numbering icon again at the top of the document.
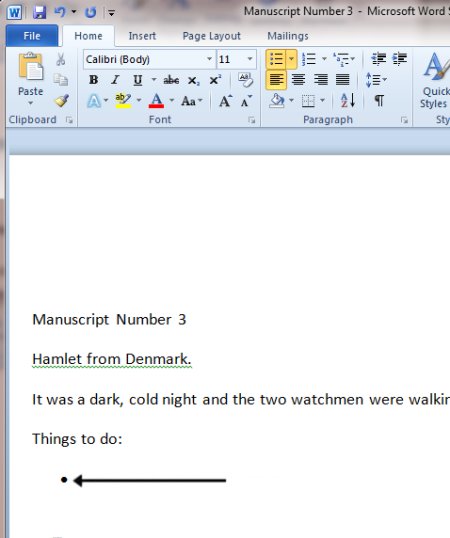
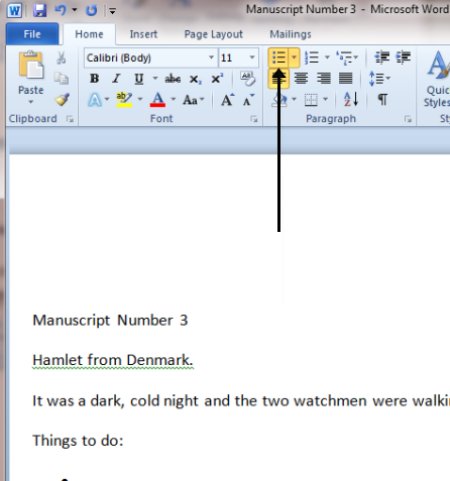
Step 7: To create a bulleted list, click on the bullets icon at the top of the screen in the menu ribbon.
Step 8: A bullet point will be inserted into your text.
Step 9: Type your list. Every time you press the ‘Enter’ key to go to the next line, a new bullet will be inserted.
Step 10: To stop bullets being inserted, click on the bullets icon again.
How to save a document
If you’ve written a bestseller or created a newsletter for your group, you’ll probably want to save it somewhere so that you can get to it again for printing or sending by email. You may also have started a document but want to finish it off later.
This guide explains how to save a document in Microsoft Word 2010. Some steps may be slightly different depending upon your version of Word.
You’ll need:
- A computer with Microsoft Word installed.
You can save a document at any point as you type it, and it’s very good practice to save every few minutes. That way, if your computer crashes before you’ve finished your composition, you won’t lose what you’ve typed.
Follow these step-by-step instructions to save a document
Step 1: Start a new document in Word and type your text.
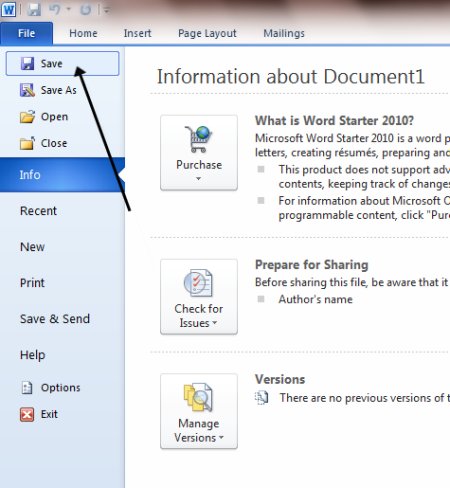
Step 2: Click File in the top left-hand corner of the screen.
Some versions of Word may have an ‘Office’ button in the top left-hand corner. Click on this to bring up the menu to continue.
Step 3: From the menu, choose Save.
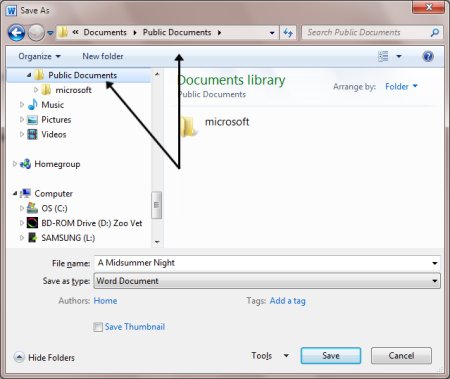
Step 4: A ‘Save’ dialogue box will come up. At the top and at the left-hand side in the list of folder options, it will show the folder where you’ll be saving the document. If you wish to change this folder, navigate through the folders on the left-hand side of the dialogue box to choose the one where you want to save your document.
Step 5: Word will automatically give your document a name, based on the first few words of your text. If you don’t like the one given, once you have chosen the destination folder, type a name for your document in the ‘File name’ box. Come up with a name that is concise but will allow you to find the document easily again.
Don’t worry about changing what’s in the box underneath, labelled ‘Save as type’. This seldom needs to be changed. It allows you to choose the type of format that all documents created with these settings will have.
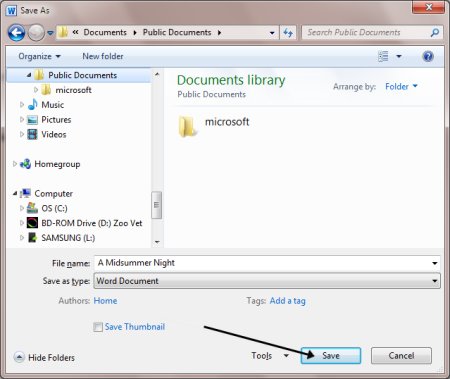
Step 6: Once you have typed in the name of your document, click Save.
Step 7: Your document will now have a name, which will be shown at the very top of your document screen. If you make changes to your document and then save them after it has been saved originally, the dialogue box will not come up again. It will just save your changes without any visual notification being shown.
Step 8: The ‘Save As’ menu – the link to which is on the left-hand side of the ‘File’ dialogue box, beneath ‘Save’ – is used to save an existing document under another name. This is helpful if you’ve made changes to your document and then want to save the changes, but also keep the original document in its original format and under its original name.
No comments:
Post a Comment